Chrome extension · Step 1 of the workflow
Phone Case Print & Mockup Studio
From five designs to a complete, listing-ready phone case kit — in one click. Print files, a main listing image and lifestyle mockups, always in your brand style.
You provide
- 5 design images — from Pinterest or a folder on your computer
You receive, per listing set
- 5 print files — 750 × 1590 px, 24-bit PNG
- 1 main composition image with five phones (3-camera or 2-camera layout)
- 5 single-case mockups
- Up to 42 lifestyle mockups of your choice
Hours saved
Print files, hero image and mockups from one button instead of a long Photoshop session.
Print-ready
Exact 750 × 1590 px HD files, sharpened, with a crop frame you control.
Consistent brand
Colours, gradients, headings, badges and stickers saved in a Profile per shop.
Guard rails
Exactly five images per listing; Etsy-friendly SKU names up to 32 characters.
User guide
Using Phone Case Print & Mockup Studio
The whole workflow takes five moves: collect 5 designs → name the folder → adjust the crop → pick your look → click Generate Mockup & Print Files.
Before you start
- Google Chrome on Windows or Mac, with an internet connection.
- Your Studio is activated by Veyronix — the extension icon is pinned in Chrome’s toolbar.
- One listing set is five images. The popup shows how many listings you have used this month.
The main screen
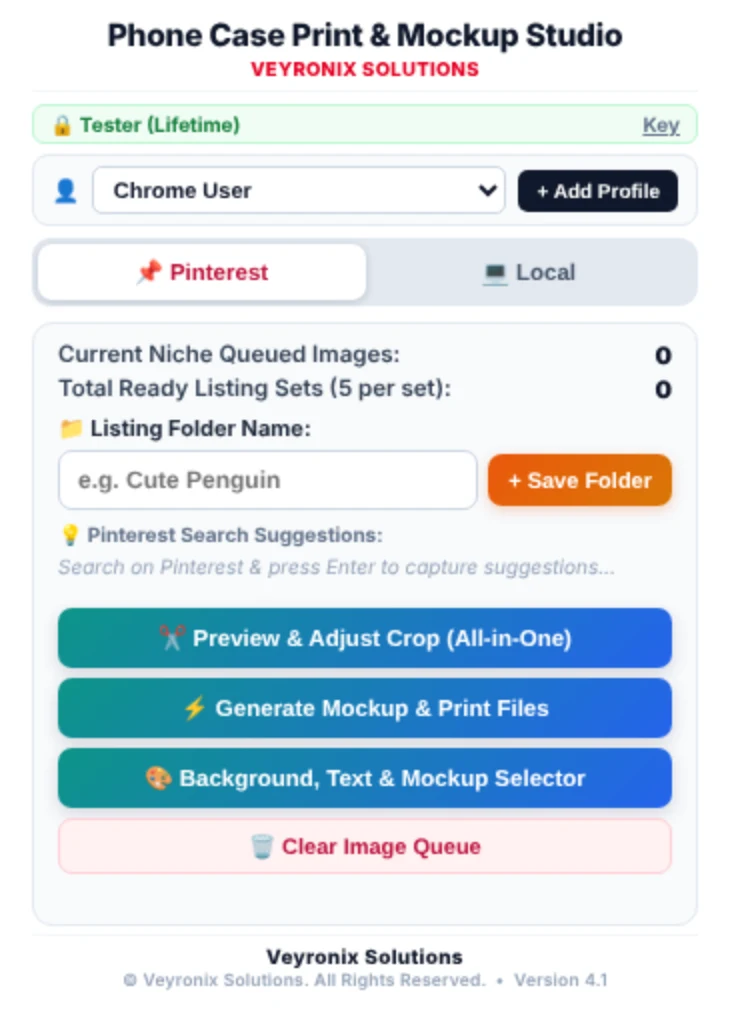
| Area | What it does |
|---|---|
| Licence bar | Your licence status and how many listings you have used. |
| Profile · + Add Profile | Separate settings for different shops or looks. |
| 📌 Pinterest · 💻 Local | Choose how you collect designs. |
| Queued images · Ready sets | Images collected so far, and complete five-image sets ready to generate. |
| Listing Folder Name · + Save Folder | Name the collected images and save them as a niche folder. |
| Pinterest Search Suggestions | Click a suggestion to use it as the folder name. |
| ✂️ Preview & Adjust Crop | Open the crop studio for all your folders. |
| ⚡ Generate Mockup & Print Files | Create all files. |
| 🎨 Background, Text & Mockup Selector | Choose colours, text, badges and mockups. |
| 🗑️ Clear Image Queue | Discard images that are collected but not saved. |
Collect designs from Pinterest
- Search for your niche on pinterest.com — for example “Cute Penguin” — and press Enter. Pinterest’s search suggestions appear in the popup.
- Hover over a large pin image and click + Add to Batch, or right-click the image and choose Add to Mockup Batch Queue.
- Collect five images per listing set (10 images = 2 sets, 15 = 3, and so on). The counter updates as you go.
- Type a Listing Folder Name (or click a suggestion) and click + Save Folder. If the number of images is not a multiple of five, the crop studio opens so you can remove the extras.
- Repeat for as many niches as you like. Saved folders appear in a list with ✂️ Crop and ✕ buttons.
- Optionally choose your look, then click ⚡ Generate Mockup & Print Files.
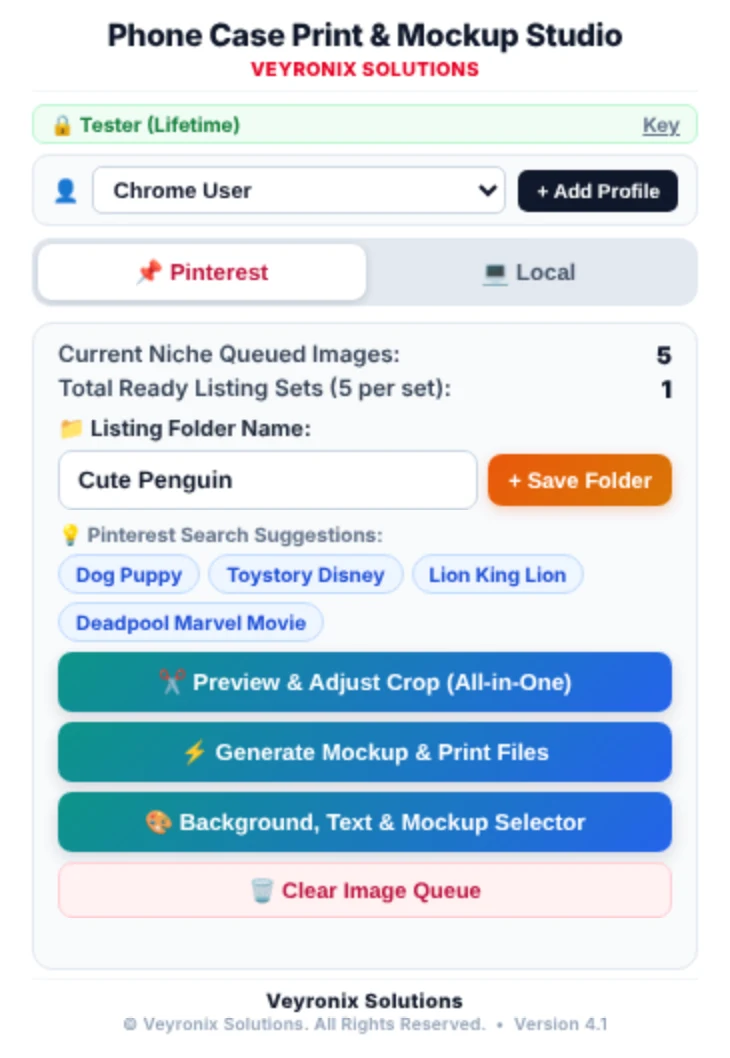
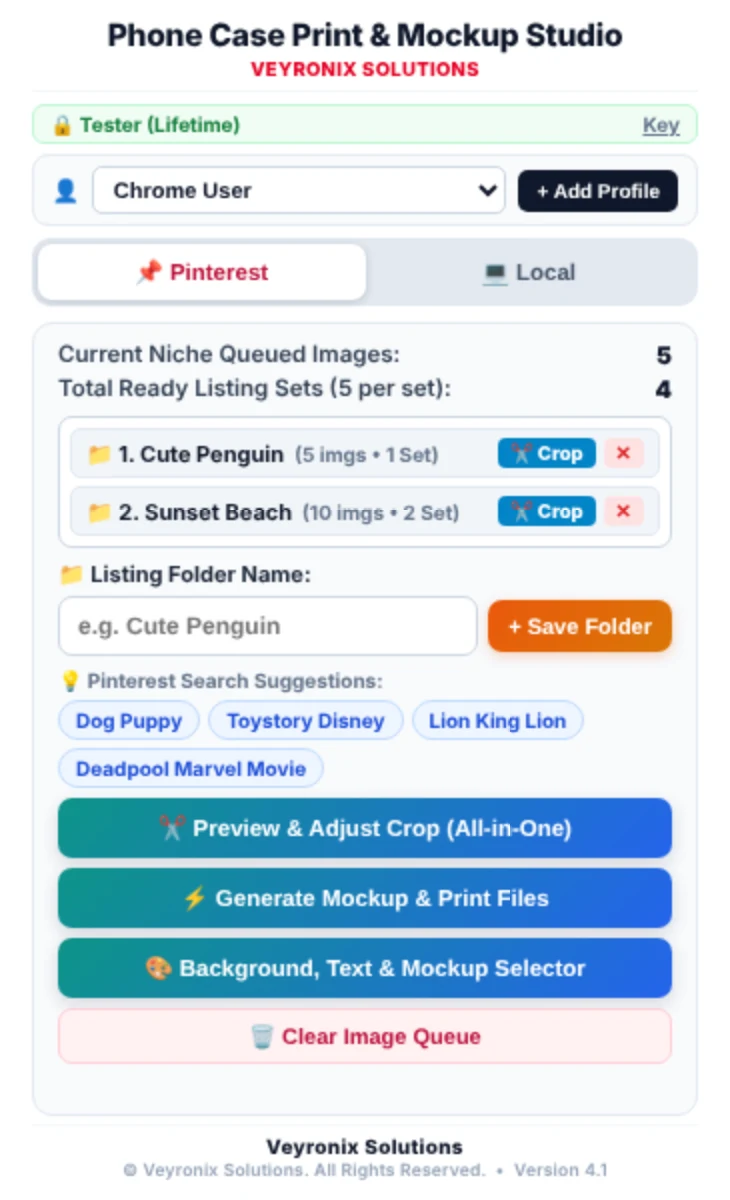
Folder names become your SKUs. Etsy allows 32 characters, so the Studio shortens long names automatically.
Use folders on your computer (Local mode)
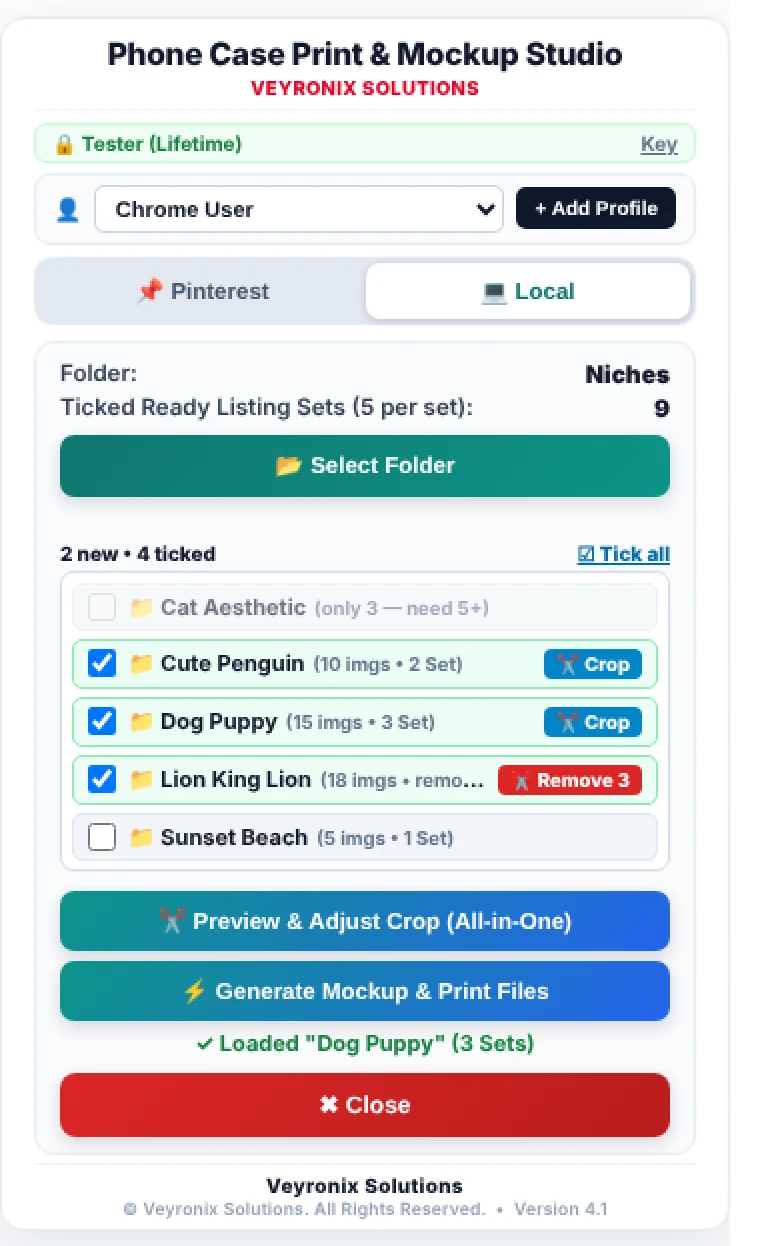
- Click 💻 Local. It opens in its own window, and the Pinterest side is locked while it is open.
- Click 📂 Select Folder and choose the main folder that holds your niche folders. Files are only read — nothing is uploaded.
- Every folder with images (jpg, png, webp) is listed, including nested folders. Tick the ones you want, or use Tick all.
- Folders need at least five images. If a count is not a multiple of five, a red Remove button shows how many to take out.
- Optionally adjust the crop, then click ⚡ Generate Mockup & Print Files. Generated folders are remembered and leave the list.
- Click the red ✖ Close button when you are done.
Local mode uses the look from your active Profile and the same monthly listing allowance. Up to 100 images per folder are used, in file-name order.
Adjust the crop
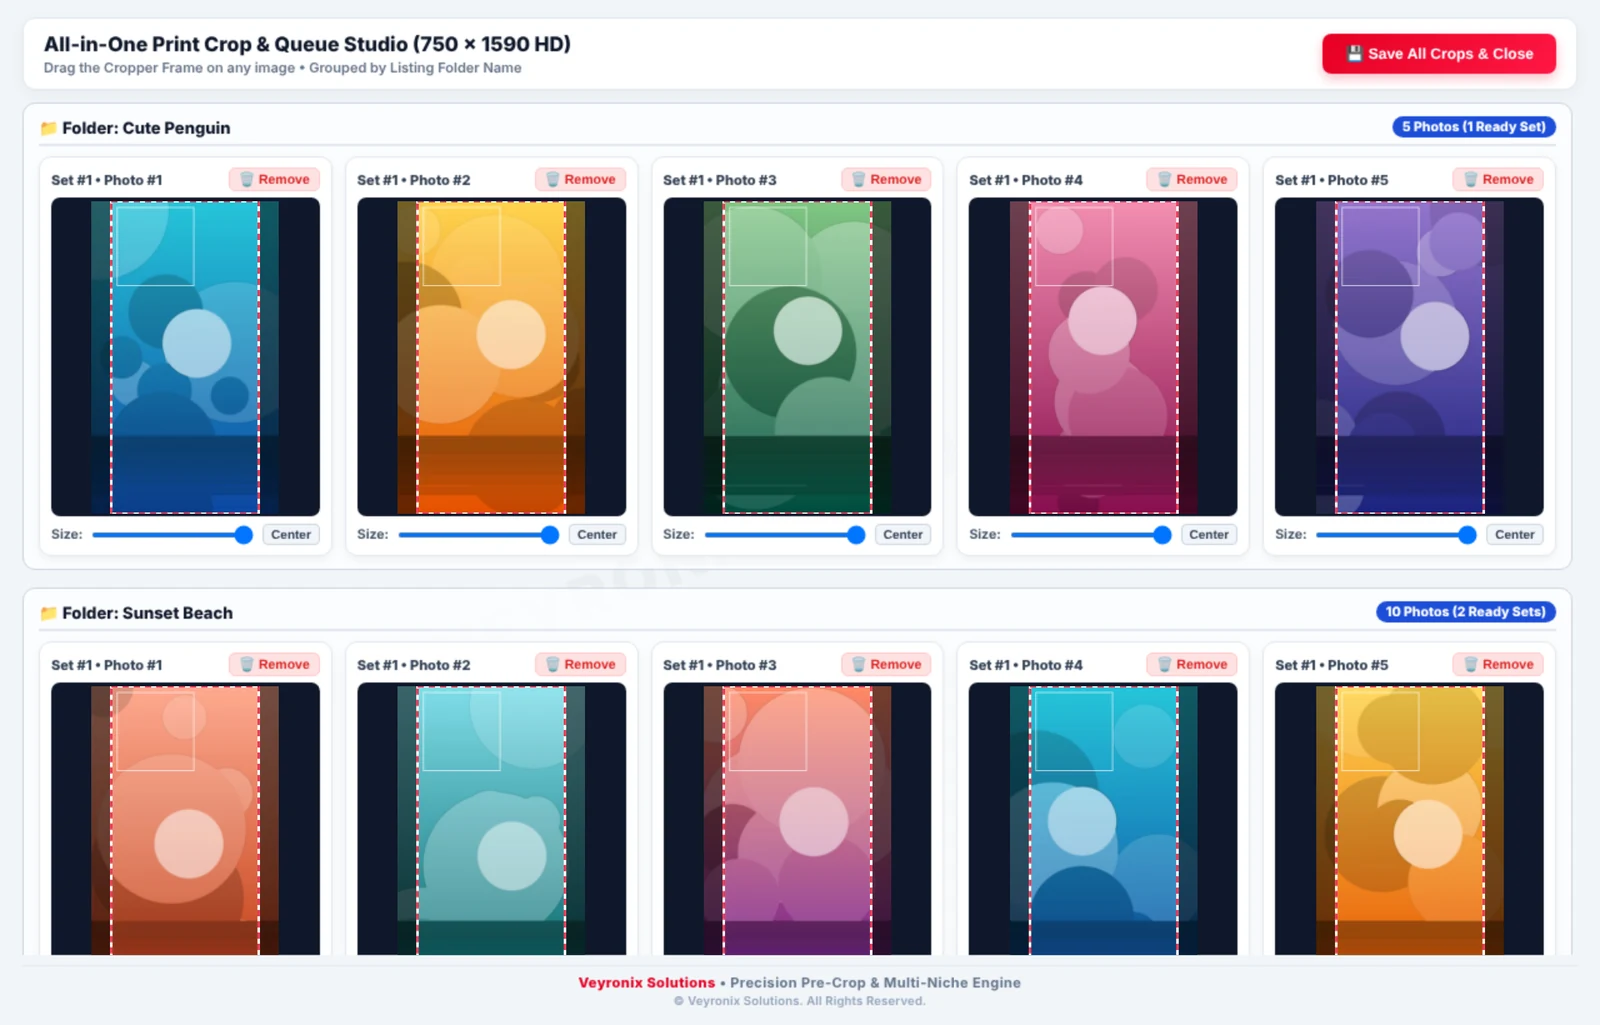
Open ✂️ Preview & Adjust Crop (All-in-One) or a folder’s ✂️ Crop button. All folders appear on one screen, grouped by name, with a counter such as “5 Photos (1 Ready Set)”.
- Drag the red dashed frame to choose exactly which part is printed.
- Use the Size slider to zoom the frame and Center to re-centre it.
- Click 🗑️ Remove to drop an image you do not want.
- Finish with 💾 Save All Crops & Close.
Choose your look
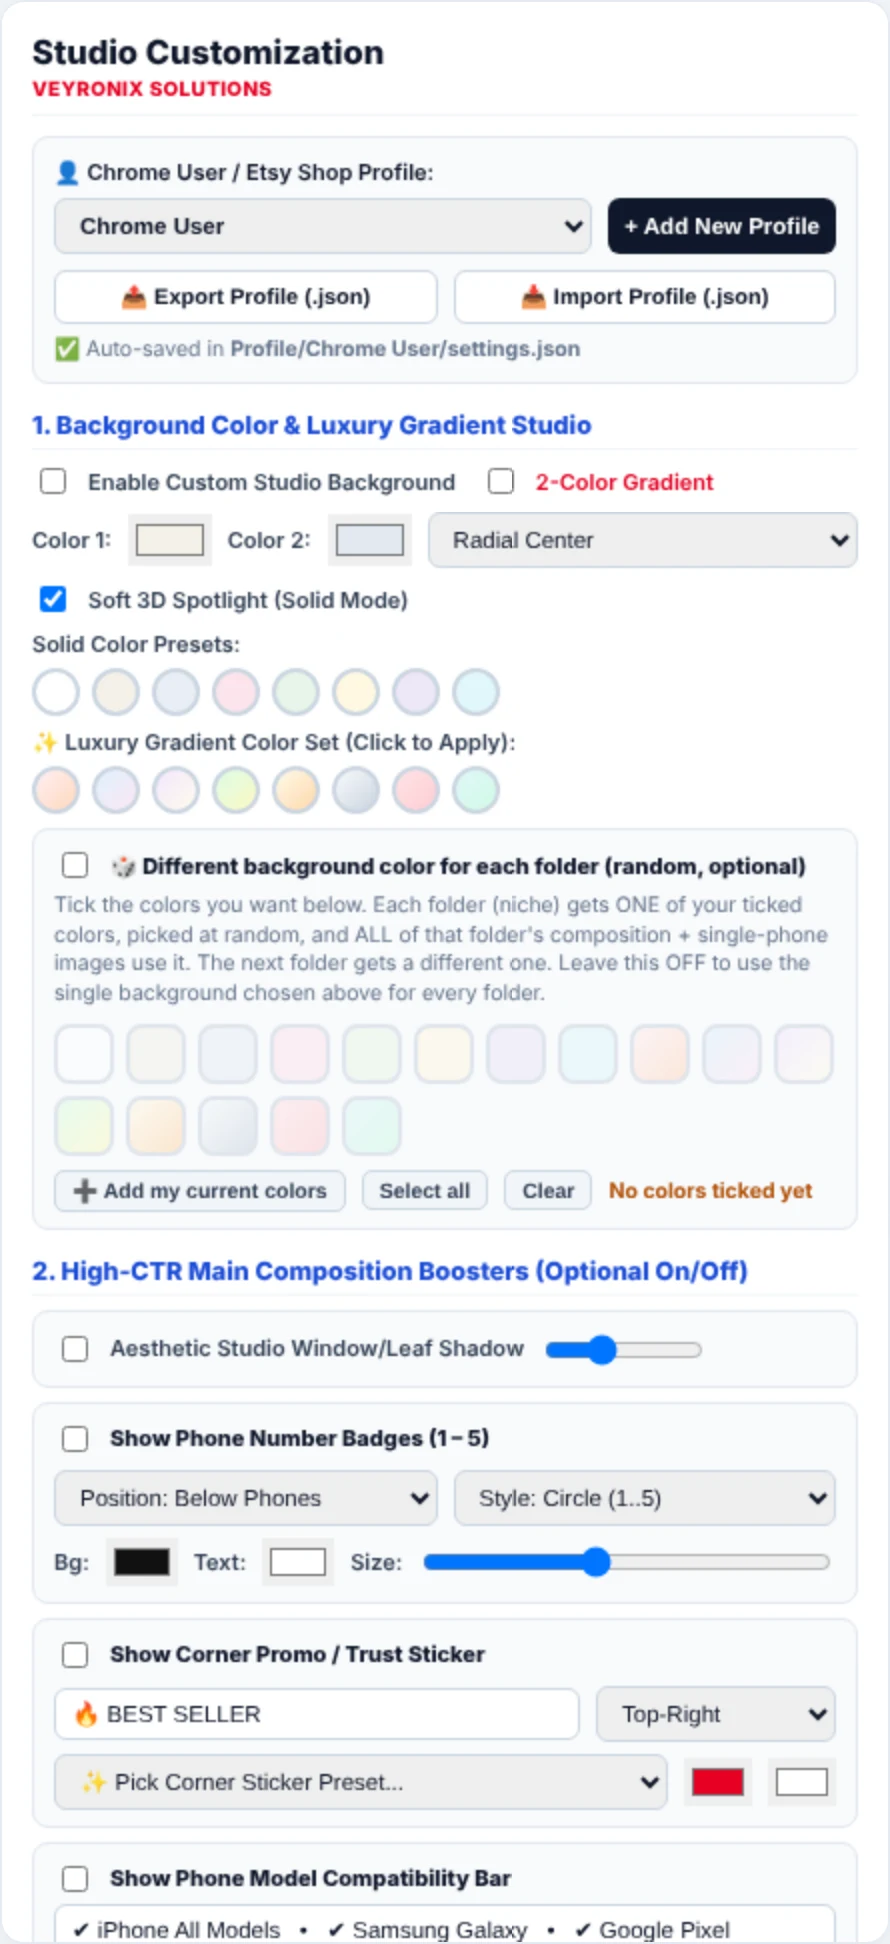
Open 🎨 Background, Text & Mockup Selector. Options are on the left and a Live Studio Preview on the right updates as you go. Everything is saved to the active Profile.
Profiles
One Profile per shop or look. Use 📤 Export / 📥 Import Profile (.json) to back up settings or move them to another computer.
Background
Solid colours or a two-colour luxury gradient (radial, diagonal or top-to-bottom), a soft 3D spotlight, and one-click presets such as Warm Alabaster, Champagne Cream, Sunset Peach or Ocean Breeze. You can also give every niche folder a random colour from a palette you pick.
Main-image boosters
Window/leaf shadow, phone number badges (1–5), a corner promo sticker (BEST SELLER, NEW COLLECTION, LIMITED EDITION… or your own text) and a phone-compatibility bar.
Heading and callout
A top heading and subtitle with ten fonts, an accent line and a bottom callout with an optional pill badge.
Composition and mockups
Choose the 3-Camera or 2-Camera main composition, and tick which of the 42 lifestyle mockups to create.
Finish with 💾 Save Settings to Active Profile & Close. ↺ Reset This Profile starts over.
Generate & find your files
Click ⚡ Generate Mockup & Print Files. Progress appears in the popup — for example “Folder 1/3 (Cute Penguin) · Set 1/2: Print File 2/5…”. One listing is counted per five-image set. Your files are saved in Chrome’s Downloads folder:
Downloads/
└── Phone Case Listing/
    └── Cute Penguin/
        ├── Cute Penguin Listing 1/
        │   ├── Print_File_1.png … Print_File_5.png     (750 × 1590)
        │   └── Mockup/
        │       ├── Generate composition.jpg            (main image)
        │       ├── design_1.jpg … design_5.jpg
        │       └── 0.jpg … 41.jpg                      (the ones you selected)
        └── Cute Penguin Listing 2/ …
This folder is ready for the Etsy Auto-Lister: it already contains the Mockup folder, the main image and Design 1–5 in the order the Auto-Lister expects.
Troubleshooting
| You see | What to do |
|---|---|
| “Nothing was generated and no listing was counted” | Check your internet connection and try again in a minute. If it repeats, send us the support code shown in the message. No listing was used. |
| “Local mode is open in another window”, but none is open | Click Unlock in that message. |
| Generate does not start | Each folder must contain a multiple of five images. Use Remove or the crop studio. |
| Listing limit reached | Message us on WhatsApp to extend your plan. |
| Part of the popup looks cut off | Close and reopen Chrome so the latest version can load. |
| Which version am I using? | The version is shown at the bottom of the popup. |
Quick reference
| I want to… | Use |
|---|---|
| Add an image from Pinterest | Hover → + Add to Batch (or right-click → Add to Mockup Batch Queue) |
| Save a niche | Type a name → + Save Folder |
| Fix the crop | ✂️ Preview & Adjust Crop |
| Use folders from my computer | 💻 Local → 📂 Select Folder |
| Change colours, text, stickers, mockups | 🎨 Background, Text & Mockup Selector |
| Make everything | ⚡ Generate Mockup & Print Files |
| Find my files | Downloads → Phone Case Listing |
Screenshots show sample designs on a demonstration build; your own designs and mockups appear in their place.
Pair it with the Auto-Lister
Your generated folders are ready to publish. Both tools come together in every plan, from €10 per month.